 Woodworking Ideas Latest Woodworking Design Ideas
Oh my goodness, have I got a treat for you today! I stumbled upon these DIY wall shelves made with dollar store items, and let me tell you- they are straight up fabulous. Not only are they totally easy to make yourself, they’ll look like you spent quite the pretty penny on them. Let’s dive in!
Table of Contents
Shelf #1: Lighted Glam Display Shelves
First up, we’ve got these amazing lighted glam display shelves. I mean, can you even? With just a few items from the dollar tree (think mirror frames and LED lights), you can create these stunning wall shelves to show off all your favorite trinkets and treasures.

What Are They?
These shelves are a combination of lighted LED strips and small square mirrors. They’re perfect for highlighting any small items you want to bring attention to, while also providing a cool and modern vibe to your room.
Why Do You Need Them?
Well, let me ask you this- who doesn’t love a touch of glam in their home? These wall shelves add that perfect pop of “oooh” and “ahhh” to any space, all while being incredibly functional for displaying your favorite items.
Different Types of Lighted Shelves
While these particular lighted shelves use square mirrors, there are a variety of other styles you can create using different dollar store items. Try using picture frames or even decorative trays for a unique take on this DIY project.
Benefits and Advantages
- Incredibly easy to make
- Cost-effective (did I mention they’re made almost entirely from dollar store items?)
- Add a touch of glam to any space
- Functional for displaying small items
How to Make Them
- Remove the glass from your mirror frames and set aside.
- Remove the backing from the frames and attach the LED light strips to the back of each frame.
- Reattach the glass to the front of the frame.
- Hang the mirrors on your wall in a pleasing arrangement.
- Plug in your LED lights and enjoy the glow!
Tips and Tricks
- Consider using command strips to hang your shelves for easy removal (and no damage to your walls!)
- Try using different colored LED lights for different moods in your space- blue for calm, red for energizing, etc.
- Experiment with different shapes and sizes of mirrors and frames for unique looks.
Shelf #2: Wood Floating Shelf
Next up, we’ve got a classic DIY floating shelf made from- you guessed it- dollar store items! This wooden wall shelf is perfect for any farmhouse or rustic decor lover.

What Is It?
This DIY shelf is made from wooden popsicle sticks and L brackets to create a sturdy and visually appealing floating shelf. The rustic symmetrical look of the popsicle sticks adds the perfect touch to any farmhouse-style decor.
Why Do You Need It?
Have you ever priced out wooden floating shelves on Etsy or through home goods stores? Oof. They can be so expensive! This DIY version is not only a fraction of the cost, but also allows you to customize it to the exact size you need.
Different Types of Floating Shelves
The possibilities are endless when it comes to floating shelves. Consider using different materials (like rope or metal brackets) to create a variety of looks. You can also play around with the length and width of your shelves to create unique arrangements.
Benefits and Advantages
- Customizable to any size
- Cost-effective
- Fits in well with rustic and farmhouse-style decor
- Sturdy and functional
How to Make It
- Cut your popsicle sticks to the desired length for your shelf. 6-8 sticks should work for most sizes.
- Use carpenters glue to bond the sticks together.
- Screw in your L brackets to where you’d like the shelf to hang.
- Place the popsicle sticks onto the L brackets, and secure with screws.
- Enjoy your new floating shelf!
Tips and Tricks
- Try staining or painting your popsicle sticks before assembling for a unique look.
- Use a level to ensure your shelf is straight before securing onto the L brackets.
- Consider adding a small lip (using additional popsicle sticks) to the front of your shelf to prevent items from falling off.
Shelf #3: Lighted Corner Shelf
Last but certainly not least, we’ve got another lighted shelf to show off some of your favorite things. This time, we’re utilizing the corner of your room for a fun and unexpected twist on traditional wall shelves.
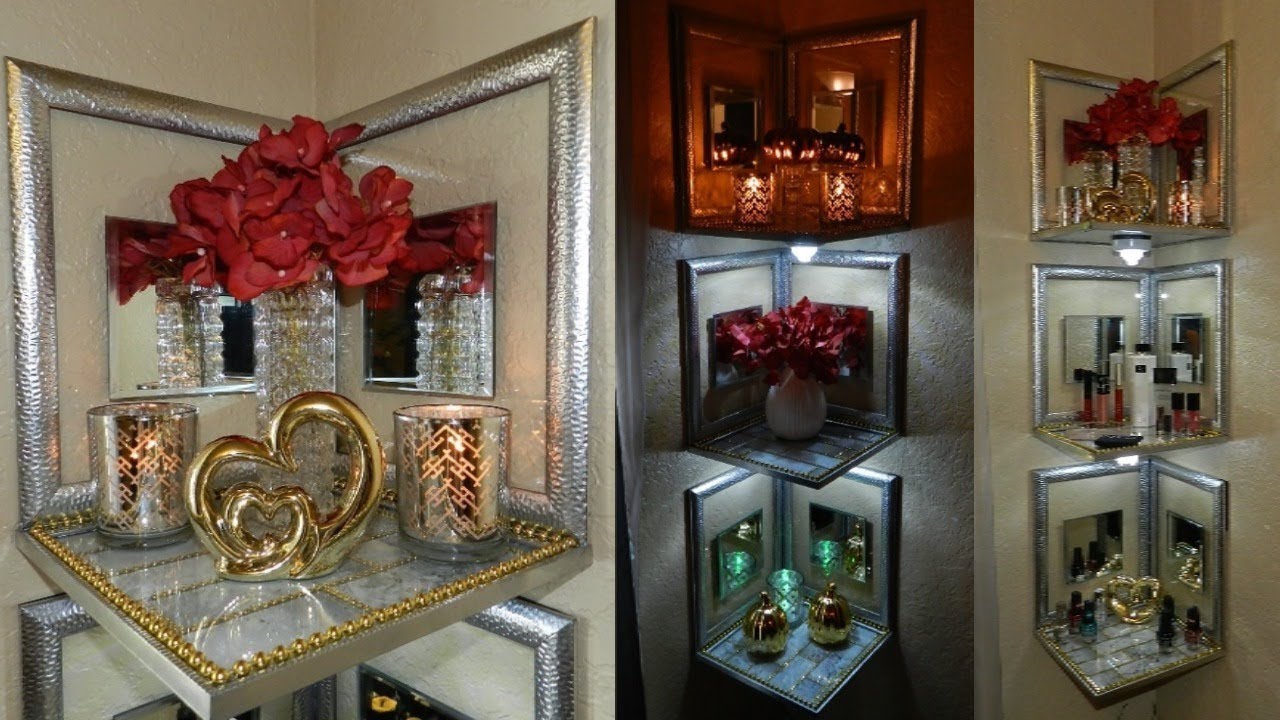
What Is It?
These super cool lighted corner shelves are made using foam core board, LED lights, and- you guessed it- things from the dollar store. They’re perfect for highlighting small decor items, like plants, trinkets, or even books.
Why Do You Need It?
If you’re looking for a unique and unexpected way to display your favorite things, these corner shelves are the perfect answer. They add a touch of modern and whimsical flair to your room that’s sure to be a conversation starter.
Different Types of Lighted Corner Shelves
Anything is possible when it comes to corner shelves- try using different shapes (like triangles or hexagons), or even playing with different color LED lights for a truly customized look.
Benefits and Advantages
- Give a unique twist on traditional wall shelves
- Add a touch of modern whimsy to any space
- Functional for displaying favorite items
- Cost-effective to make
How to Make It
- Cut your foam core board to the desired size and shape for your shelf (you’ll want two identical pieces for each shelf).
- Using a craft knife, cut out the shape for your LED lights on one of the foam core board pieces.
- Attach the LED lights to the inside of the cut-out foam core board.
- Sandwich the LED foam core board between the two identical foam core pieces.
- Attach Command strips to the back of your shelves for easy hanging onto your wall.
- Plug in your LED lights and enjoy your new corner shelves!
Tips and Tricks
- Experiment with different shapes and sizes for your shelves for a truly unique look.
- Use a level to ensure your shelves are hung straight in the corner of your room.
- Try different colors of LED lights for a cool effect.
Well folks, there you have it- three amazing DIY wall shelves made almost entirely from dollar store items. Which one will you try first?


