 Woodworking Ideas Latest Woodworking Design Ideas
I recently came across some inspiring DIY ideas that I just have to share with you all! If you’re someone who loves creating and organizing while sticking to a budget, then you’ll definitely want to check these out!
Table of Contents
Dollar Tree DIY SHELF
This first project is a bookshelf made entirely from Dollar Tree items! Yes, you read that right, everything used to create this stunning piece came from Dollar Tree! Not only is this a bargain, but it’s also a great way to put items you already have to good use.

What is it?
This is a DIY bookshelf made using items purchased at Dollar Tree. The shelves are made from foam board and the brackets from cardboard.
Why make it?
Creating your own bookshelf is an excellent way to save money, while also having a unique and personalized item in your home. Additionally, using foam board and cardboard to create the shelves and brackets makes this project light weight and easy to move around if needed.
Different types of shelves
There are a multitude of different types of shelves that you can create using items from your local Dollar Tree. From rustic farmhouse shelves to sleek modern floating shelves, there’s a style to suit every taste!
Benefits and advantages
The main benefit of creating your own shelf is obviously the cost savings. However, you also have complete control over the design and can customize the item to match your decor. By using Dollar Tree items, you’re also able to repurpose items and give them a new life rather than contributing to waste.
How to make it
To make this bookshelf, you’ll need:
- Five foam boards
- Two cardboard pieces
- Hot glue gun and glue sticks
- Box cutter or utility knife
- Paint and paintbrush (optional)
Start by using the cardboard to create the brackets. Once you have the brackets, you’ll then attach them to the foam boards to create the shelves. Use the hot glue gun to attach the brackets to the foam board shelf. To make sure the shelves are secure, it’s recommended that you cut a small hole in the foam board and slide the bracket through this hole. Then, you can use the hot glue gun to fix the bracket to the foam board.
Tips
When cutting the foam board and cardboard, it’s important to make sure you have a sharp blade. This will ensure that you’re able to make clean cuts in the material. You can also use paint to add a pop of color or to create a distressed look.
Dollar Tree DIY Farmhouse Decor Shelf
This next project is another Dollar Tree DIY item that is perfect for adding some charm to your home. This wooden wall shelf would make a great addition to a kitchen or living room, and the best part is it only costs a few dollars to create!

What is it?
This is a DIY wooden wall shelf made using only Dollar Tree items. The shelf itself is made from a picture frame and two wooden chopping boards from Dollar Tree, while the brackets are made from wooden craft sticks.
Why make it?
This is a great way to add some rustic charm to your home without breaking the bank. The shelf can be used to display photos, knick knacks, or even as a place to store spices in the kitchen.
Different types of shelves
There are so many different styles and designs of shelves that you can create using Dollar Tree items. From rustic farmhouse to sleek modern, there’s something to suit every taste!
Benefits and advantages
The main advantage of creating your own shelves is the cost savings. You’re also able to customize the item to match your decor, and using Dollar Tree items means that you’re also able to repurpose items and give them a new life rather than contributing to waste.
How to make it
To make this wooden wall shelf, you’ll need:
- A large picture frame with the glass removed
- Two wooden chopping boards
- A pack of wooden craft sticks
- Hot glue gun and glue sticks
- Saw (optional)
- Paint and paintbrush (optional)
Start by removing the glass from the picture frame, and then use hot glue to attach the two wooden chopping boards to the bottom of the frame. For the brackets, you’ll use the wooden craft sticks to create two triangles that will support the weight of the shelf. Paint or stain the shelf to match your decor.
Tips
When making the brackets, make sure that they are thick enough to support the weight of the shelf. Pillowcases or sheets from Dollar Tree can be used to create a shabby-chic look by covering the wooden chopping boards with fabric.
DIY GLAM LIGHTED DISPLAY WALL SHELVES
If you’re looking for a way to create some extra sparkle in your home, then these glam lighted display wall shelves are the perfect solution. These shelves would make a great addition to a bedroom or living room and are sure to impress any guests!

What is it?
This is a DIY project that combines lighted shelves with elegant styling to create a truly stunning centerpiece for any room in your home. They are perfect for showcasing your favorite decor items and will add a touch of sparkle to your living space.
Why make it?
Adding some sparkle and shine to your home is always a good idea, and these shelves are an easy way to do just that. They’re perfect for anyone who loves a touch of glam in their decor.
Different types of shelves
There are a variety of different types of lighted shelves that you can create. From glam to rustic farmhouse, the type of shelves you create will depend on your personal style and home decor.
Benefits and advantages
The main benefit of creating your own lighted shelves is being able to customize them to match your decor. They’re also an excellent way to showcase your favorite decor items, and the lights add a touch of sparkle to your living spaces.
How to make it
To make these lighted display wall shelves, you’ll need:
- Three shadow boxes
- LED push lights
- Glitter spray paint
- Small mirrors or glass sheets
- Hot glue gun and glue sticks
Start by painting the inside of the shadow boxes with glitter spray paint. Once the paint has dried, apply hot glue to the back of the shadow boxes and insert the small mirrors or glass sheets in them. Then, attach the LED push lights to the inside of the shadow boxes using hot glue.
Tips
Make sure that the shadow boxes you purchase are deep enough to hold the LED push lights. If you want to add more sparkle, you can also decorate the shelves with rhinestones, pearls or glitter.
Gold Shelves DIY
If you’re someone who loves a touch of glam in your home decor, then these Dollar Tree DIY gold shelves are a great way to add some sparkle to your living spaces without breaking the bank.

What is it?
This is a DIY project that creates elegant gold shelves using Dollar Tree items. These shelves are perfect for adding some sparkle to your living spaces, and the gold finish adds a touch of sophistication to your decor.
Why make it?
The primary reason to make these gold shelves is to add some over-the-top glam to your decor. These shelves would look amazing in a beauty room, living space or bedroom, and are sure to impress any guest!
Different types of shelves
There are a variety of different types of shelves you can create using Dollar Tree items, from rustic farmhouse to modern chic. You can customize the type of shelves you create to suit your personal style and home decor.
Benefits and advantages
The main benefit of creating your own gold shelves is the cost savings, as well as the ability to customize the shelves to match your decor. Additionally, the gold finish on these shelves creates a look of sophistication and luxury that would be difficult to achieve with most other materials.
How to make it
To make these gold shelves, you’ll need:
- Three wire cooling racks
- Gold spray paint
- Hot glue gun and glue sticks
- Optional: Painters tape to create patterns or stripes
Start by laying out the cooling racks and spray painting them gold. Once the paint has dried, use hot glue to stack the racks on top of each other, creating a stack of three. Make sure that the feet of each rack are glued to the one below it to create stability.
Tips
If you want to create a more intricate design, use painters tape to create stripes or patterns before spray painting. You can also add decorative items such as flowers or candles to the shelves for a more personalized touch.
Dollar Tree DIY Storage Shelf
This next project is perfect for anyone who has a need for some extra storage space. This DIY Dollar Tree storage shelf is easy to create and will provide you with a place to store items while keeping them organized and easily accessible.

What is it?
This is a DIY storage shelf made using Dollar Tree items. It’s perfect for adding some extra storage space to a closet, garage or pantry, and is easy to customize to fit the space you have available.
Why make it?
Creating your own storage shelf is a great way to save money while also providing yourself with the additional storage space you need. It’s also easy to customize to fit your decor and personal style.
Different types of shelves
There are many different types of storage shelves that you can create using Dollar Tree items. From bookshelves to shoe racks, the type of storage shelf you create will depend on your personal needs and the space you have available.
Benefits and advantages
The main benefit of creating your own storage shelf is the cost savings. Additionally, creating your own shelf allows you to customize it to fit your needs and style, and using Dollar Tree items means that you’re able to repurpose items and give them a new life rather than contributing to waste.
How to make it
To make this storage shelf, you’ll need:
- 39 foam boards
- 72 plastic zip ties
- Scissors or wire cutters
- Optional: Paint to add a pop of color or distressed look
Start by cutting the foam boards into six pieces each. Using the plastic zip ties, stack the foam board pieces to create the frame of the shelf. Cut off the excess plastic. Once the frame is complete, lay the remaining foam board pieces on top to create the shelves.
Tips
When creating the shelf, it’s important to make sure that the boards are tightly secured together. If you’re looking for a more colorful look, you can also paint the foam boards before assembling the shelf.
Dollar Tree DIY Lighted Corner Shelves
These stunning lighted corner shelves are perfect for adding some extra storage space, while also creating a truly unique and eye-catching feature in your home. They’re easy to create, and the best part is they’re made entirely from Dollar Tree items!
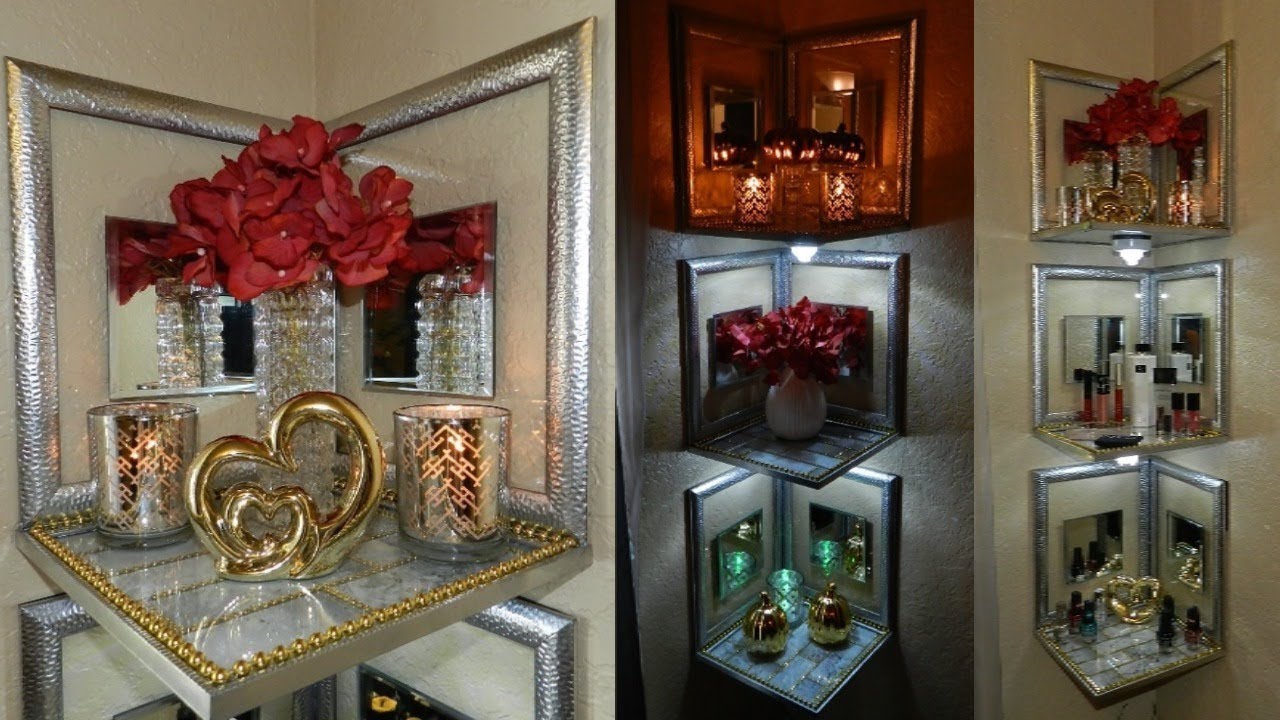
What is it?
These lighted corner shelves are made using Dollar Tree items and are a great way to add some extra storage space while also creating a striking feature in your home.
Why make it?
These shelves are perfect for anyone who loves creating unique and personalized decor items. They’re also a great way to add some extra storage space to a corner of your room without taking up too much space.
Different types of shelves
There are many different types of corner shelves that you can create using Dollar Tree items. From lighted shelves to rustic farmhouse, there’s a style for everyone!
Benefits and advantages
The main benefit of creating your own corner shelf is the cost savings. Additionally, creating your own shelf allows you to customize it to fit your needs and style, and using Dollar Tree items means that you’re able to repurpose items and give them a new life rather than contributing to waste.
How to make it
To make these lighted corner shelves, you’ll need:
- Three shadow boxes
- LED push lights
- Hot glue gun and glue sticks
- Command hanging strips
Start by painting the shadow boxes and attaching the LED push lights inside. Once the paint has dried, use the hot glue gun to secure the shadow boxes together at a 90-degree angle. Use the Command hanging strips to attach the shelf to the wall.
Tips
Make sure that the Command strips are strong enough to hold the weight of the shelf. If you’re creative, you can always add a personal touch to the shelf using flowers, garlands, or even photos!
There you have it, six amazing Dollar Tree DIY shelf projects that you can create using items from your local Dollar Tree. These projects are perfect for adding some extra storage space to your home, while also creating some unique and personalized decor items.


