 Woodworking Ideas Latest Woodworking Design Ideas
Are you looking for ways to save space in your home or garage? Check out these easy DIY shelf ideas!
Table of Contents
Pin auf Platz sparen

What is it?
This DIY project involves creating floating shelves, perfect for displaying photos or other decorative items. These shelves are customizable to fit any space and can be made from materials like wood, metal brackets, or even floating shelf kits.
Why use it?
By using floating shelves, you’ll free up floor space and create a minimalist look. You can also mix and match different materials to create a unique display. Plus, these shelves are relatively easy to install and can be done in a weekend!
Different types of materials:
- Wooden planks
- Metal brackets
- Floating shelf kits
Benefits:
- Customizable to fit any space
- Creative and unique display option
- Makes the room feel more spacious
Advantages:
- Easy to install
- Relatively inexpensive
- Can be done in a weekend
How to:
- Measure the desired shelf size and cut wooden planks or purchase a floating shelf kit.
- Install the metal brackets securely into the wall.
- Place the wooden plank or kit onto the brackets and secure in place.
- Repeat for as many shelves as you’d like!
Tips:
- Use a level to ensure your shelves are straight.
- Consider painting or staining your shelves to match your decor.
- Stay organized by using baskets or containers to group similar items together on the shelves.
Easy Pretty Plywood Shelves

What is it?
This DIY project involves creating open plywood shelves that can be used for storage and display purposes. These shelves can be made to fit any space and can be painted or left unfinished for a more rustic look.
Why use it?
Plywood is a versatile material that can be used in a variety of DIY projects. By using plywood shelves, you’ll be able to create a custom storage solution that fits your specific needs. Plus, open shelving is a popular and modern design trend that will make any room look more spacious and inviting.
Different types of materials:
- Plywood sheets
- Wood glue
- Brad nails
- Sandpaper
- Paint and painting supplies (optional)
Benefits:
- Customizable to fit any space
- Provides extra storage and display space
- Modern and minimalist design
Advantages:
- Relatively easy to make
- Requires minimal materials and tools
- Affordable
How to:
- Measure the desired shelf size and cut the plywood sheets to fit.
- Use wood glue and brad nails to assemble the shelves.
- Sand the shelves to ensure a smooth surface.
- Paint or stain the shelves to match your decor (optional).
- Install the shelves securely onto the wall.
- Enjoy your new storage and display space!
Tips:
- Be sure to sand the plywood before installing to prevent splinters.
- Consider adding brackets or reinforcements for extra support if needed.
- Add decorative items such as plants, books, or photos to enhance the look of the shelves.
DIY Pantry Shelves – The Navage Patch

What is it?
This DIY project involves creating custom pantry shelves to help organize food, spices, and other kitchen essentials. The shelves can be designed to fit any space and can be made from a variety of materials such as wood, metal, or wire.
Why use it?
By using custom pantry shelves, you’ll be able to maximize your storage space and keep items organized and easily accessible. Plus, having an organized pantry makes meal planning and grocery shopping easier!
Different types of materials:
- Wooden planks
- Metal or wire shelving
- Shelf brackets
Benefits:
- Maximizes storage space in pantry
- Makes meal planning and grocery shopping easier
- Keeps food and spices organized and easily accessible
Advantages:
- Can be customized to fit any space
- Relatively easy to install
- Uses minimal tools and materials
How to:
- Measure the space in your pantry and decide on the desired shelf size and layout.
- Purchase or cut wooden planks to the desired size and install shelf brackets onto the wall.
- Place the wooden planks onto the brackets and secure in place.
- Alternatively, consider using metal or wire shelving that can be easily installed and adjusted as needed.
- Organize your pantry items on the shelves and enjoy your newfound organization!
Tips:
- Consider labeling shelves and containers for easy identification.
- Maximize vertical space by installing shelves all the way to the ceiling.
- Group like items together to make meal planning and grocery shopping easier.
Very easy garage shelving | Ana White

What is it?
This DIY project involves creating sturdy and affordable garage shelving using basic materials such as 2x4s and plywood. These shelves can be customized to fit any size garage and can hold heavy items such as tools and sports equipment.
Why use it?
By creating your own garage shelving, you’ll be able to save money and create a storage solution that’s tailored to your specific needs. Plus, these shelves are easy to install and can be done in a weekend!
Different types of materials:
- 2x4s
- Plywood sheets
- Screws
Benefits:
- Customizable to fit any garage size
- Sturdy enough to hold heavy items
- Affordable compared to pre-made garage shelving
Advantages:
- Easy to build
- Can be done in a weekend
- Uses basic and affordable materials
How to:
- Measure the space in your garage and decide on the desired shelving layout and dimensions.
- Cut 2x4s to the desired lengths and assemble the shelving frame.
- Attach plywood sheets onto the frame using screws.
- Install the shelving onto the wall and enjoy your new storage space!
Tips:
- Be sure to use a level during installation to ensure the shelves are straight.
- Consider painting or staining the shelves to match your garage decor.
- Organize items on the shelves by category for easy access.
How to Build Garage Shelving – Easy, Cheap and Fast!

What is it?
This DIY project involves creating simple and affordable garage shelving using basic materials such as 2x4s and plywood. These shelves can be customized to fit any size garage and can hold heavy items such as tools and sports equipment.
Why use it?
By creating your own garage shelving, you’ll be able to save money and create a storage solution that’s tailored to your specific needs. Plus, these shelves are easy to install and can be done in a weekend!
Different types of materials:
- 2x4s
- Plywood sheets
- Screws
Benefits:
- Customizable to fit any garage size
- Sturdy enough to hold heavy items
- Affordable compared to pre-made garage shelving
Advantages:
- Easy to build
- Can be done in a weekend
- Uses basic and affordable materials
How to:
- Measure the space in your garage and decide on the desired shelving layout and dimensions.
- Cut 2x4s to the desired lengths and assemble the shelving frame.
- Attach plywood sheets onto the frame using screws.
- Install the shelving onto the wall and enjoy your new storage space!
Tips:
- Be sure to use a level during installation to ensure the shelves are straight.
- Consider painting or staining the shelves to match your garage decor.
- Organize items on the shelves by category for easy access.
Easy DIY Closet Shelves Tutorial – Modern Wood – arinsolangeathome
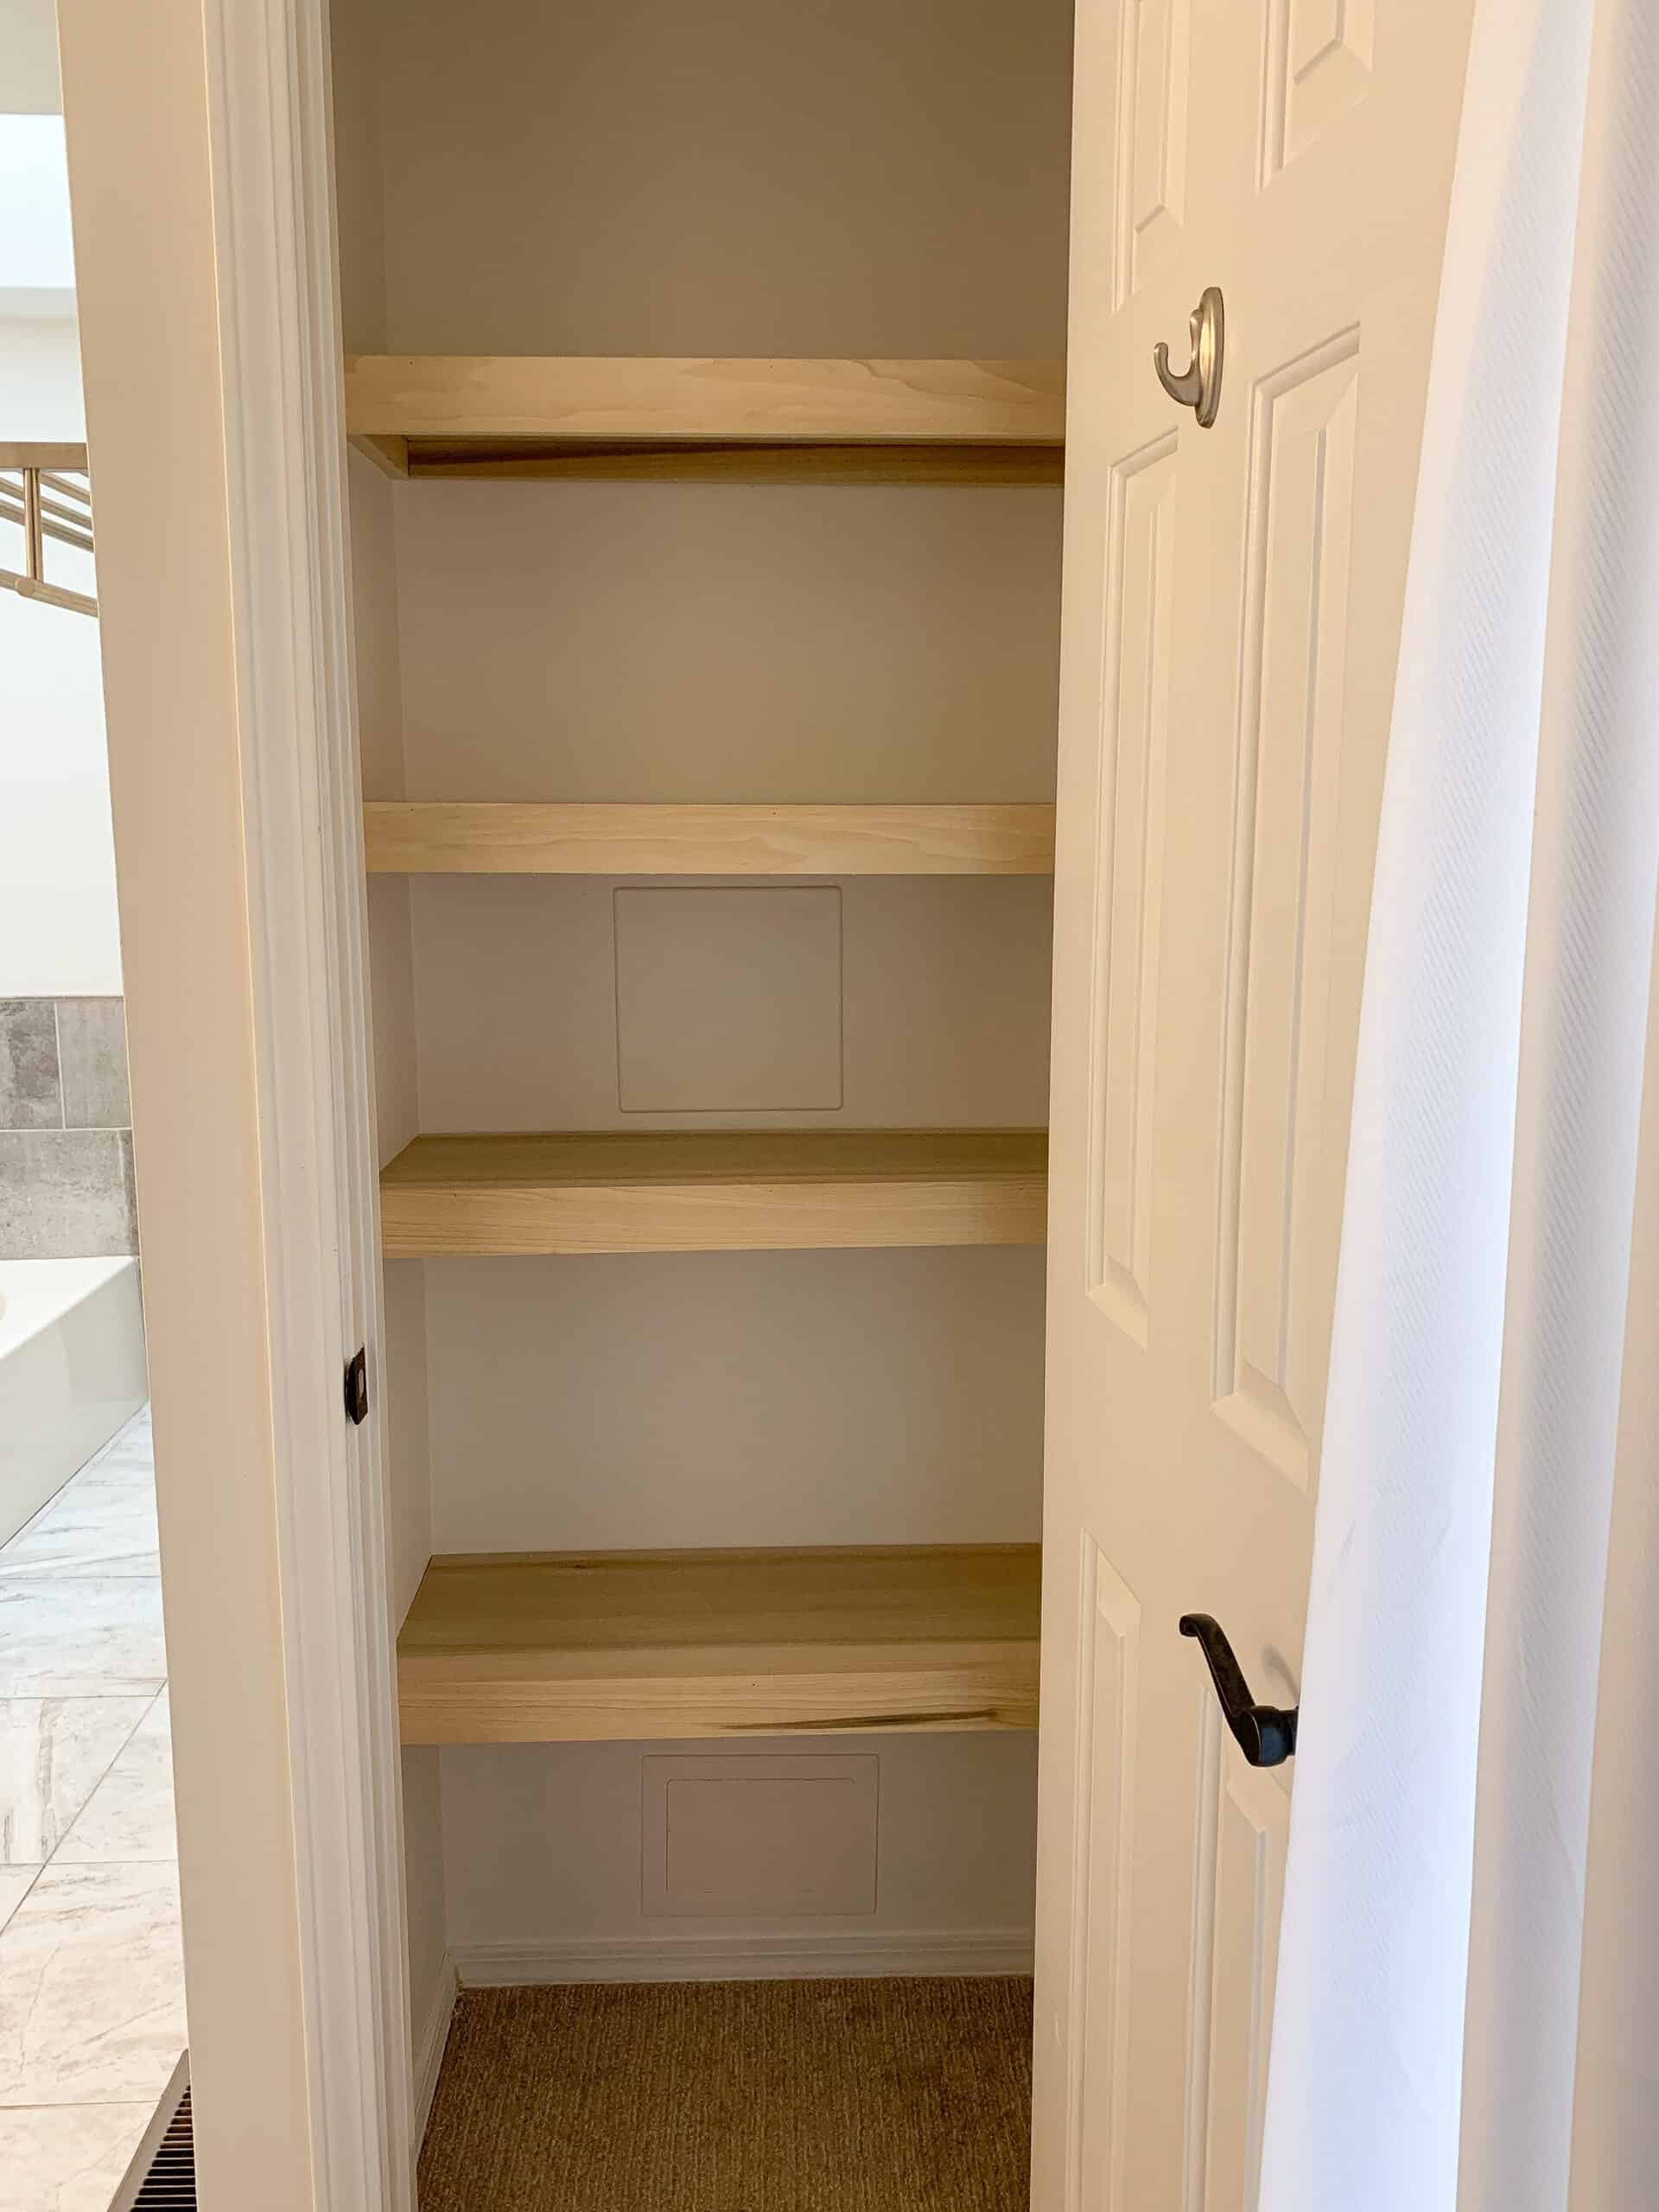
What is it?
This DIY project involves creating custom closet shelves using modern materials such as wood dowels and metal brackets. These shelves can be customized to fit any size closet and can hold clothes, shoes, and other accessories.
Why use it?
By creating your own closet shelves, you’ll be able to save money and create a storage solution that’s tailored to your specific needs. Plus, these shelves add a modern and minimalist touch to your closet!
Different types of materials:
- Wood dowels
- Metal brackets
- Wood glue
- Screws
Benefits:
- Customizable to fit any closet size
- Adds a modern and minimalist touch to any closet
- Provides extra storage space for clothes and accessories
Advantages:
- Easy to build
- Uses modern and affordable materials
- Can be done in a weekend
How to:
- Measure the space in your closet and decide on the desired shelf layout and dimensions.
- Cut wood dowels to the desired lengths and attach metal brackets onto the wall.
- Slide the wood dowels into the brackets and secure in place with wood glue and screws.
- Organize your clothes and accessories on the shelves and enjoy your new closet space!
Tips:
- Consider painting the wood dowels to match your closet decor.
- Use shelf liners to prevent clothes and accessories from slipping off the shelves.
- Group similar items together to make your closet more organized and functional.
2×4 Garage Storage | The Wolven House Project
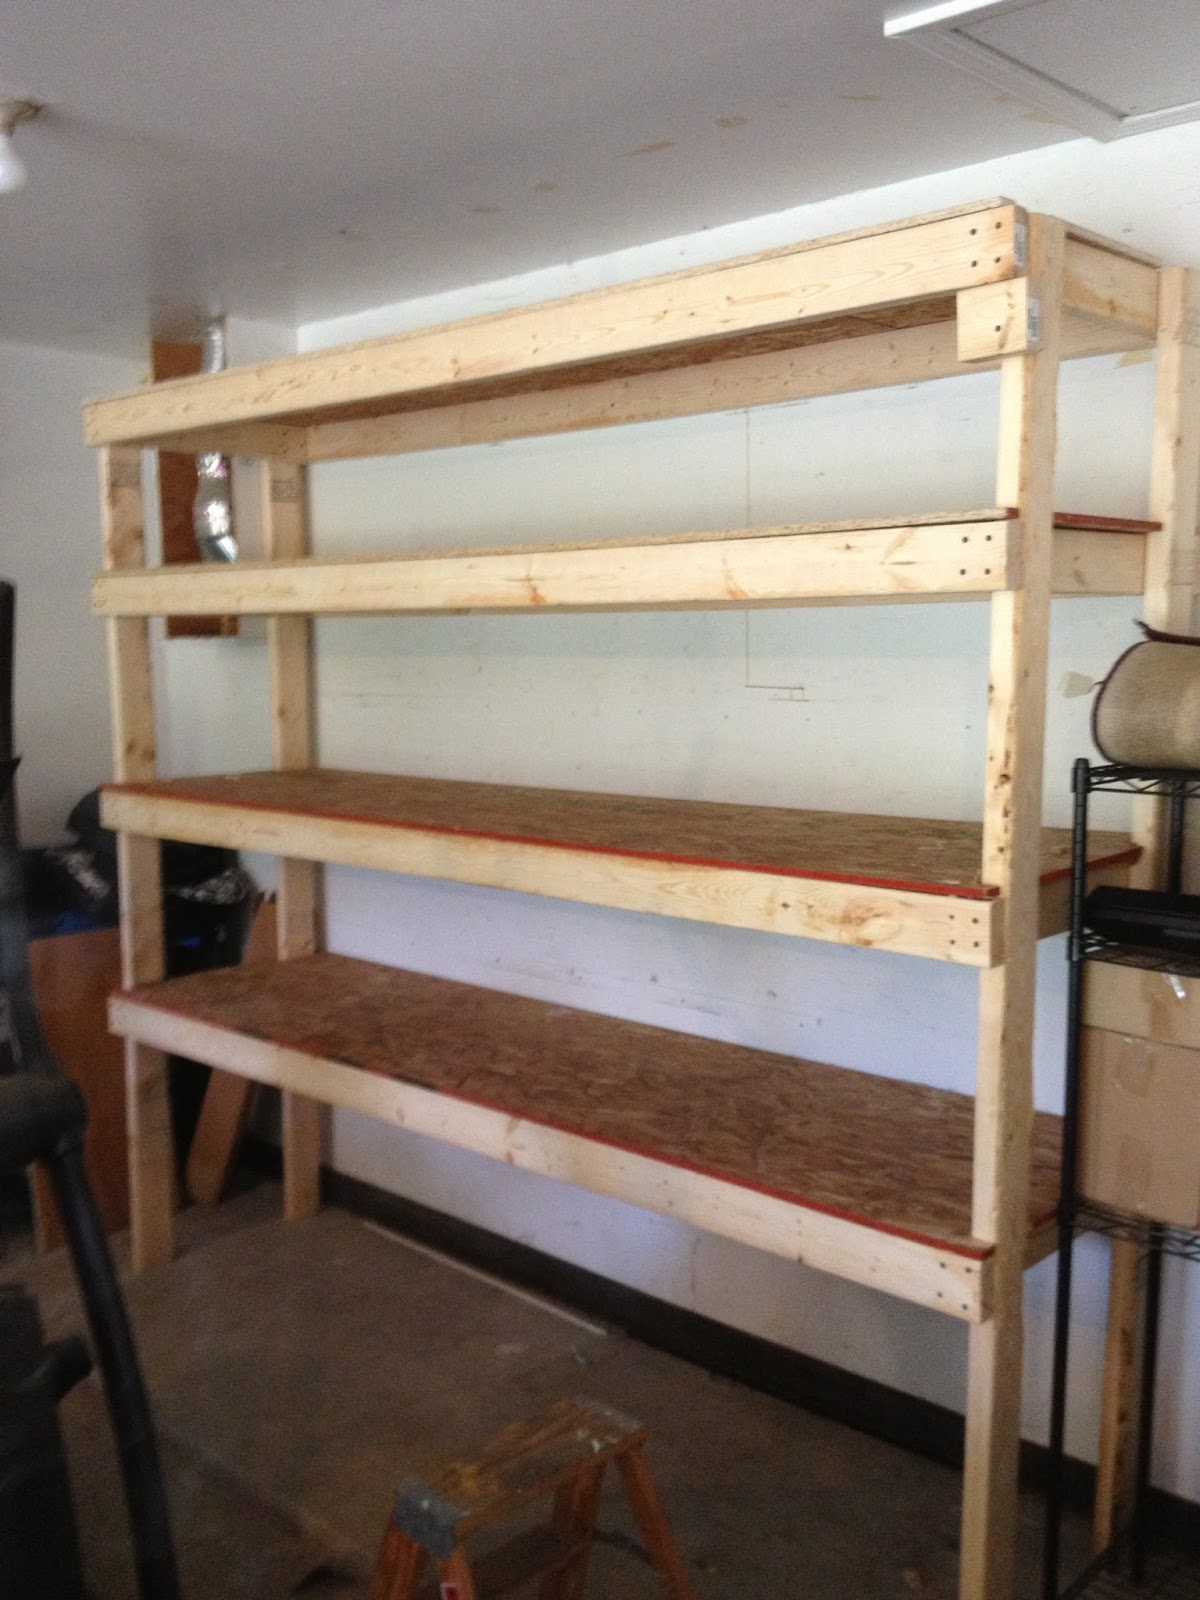
What is it?
This DIY project involves creating sturdy and affordable garage shelving using basic materials such as 2x4s and plywood. These shelves can be customized to fit any size garage and can hold heavy items such as tools and sports equipment.
Why use it?
By creating your own garage shelving, you’ll be able to save money and create a storage solution that’s tailored to your specific needs. Plus, these shelves are easy to install and can be done in a weekend!
Different types of materials:
- 2x4s
- Plywood sheets
- Screws
Benefits:
- Customizable to fit any garage size
- Sturdy enough to hold heavy items
- Affordable compared to pre-made garage shelving
Advantages:
- Easy to build
- Can be done in a weekend
- Uses basic and affordable materials
How to:
- Measure the space in your garage and decide on the desired shelving layout and dimensions.
- Cut 2x4s to the desired lengths and assemble the shelving frame.
- Attach plywood sheets onto the frame using screws.
- Install the shelving onto the wall and enjoy your new storage space!
Tips:
- Be sure to use a level during installation to ensure the shelves are straight.
- Consider painting or staining the shelves to match your garage decor.
- Organize items on the shelves by category for easy access.
Now that you have an array of easy DIY shelf ideas, you can take on the challenge of decluttering and organizing your home or garage. With basic materials and tools, you can create a custom storage solution that fits your specific needs and budget. So get creative and start building!


